I'm a comfort first kinda girl, I mean sure I like to look nice, but if it comes down to fashion vs comfort, I'm going for comfort every time. So to that end I tend to wear a lot of big, baggy, comfy tee shirts. I have an ample chest and I hate anything snug and tight across the chest, which happens waaaaaaaaaaaaay too often when you have girls like mine. Big baggy tee shirts aren't tight in the chest...YAY ME ! Unfortunately they're also not very attractive...BOOO !
So I sat down one day and figured there has to be a way to make those damn shirts look a little nicer and yet still be comfy in them....and then I locked myself in the craft room and broke out the scissors. My family could hear muffled, crazy laughter, and some words not fit to repeat on a blog. Eventually I emerged from my lair giggling like a school girl...I did it !! If I can do it, goodness knows anyone can do it...it's easy really :)
So here's how you turn a big, baggy, comfy yet ugly tee shirt into a cute little peasant top without sacrificing comfort :)
Step 1. - Find the shirt you want to use. I chose this dye FAIL below. If you buy a shirt for this, I'd suggest buying something at least a size or two larger than you would normally wear.
Fold the shirt in half like in the photo and lay it out on your cutting mat.
Step 2. - CUT !! cut the shirt in the way shown below. It's two straight cuts, so easy even a caveman could do it ;) Yeah I know there are ragged edges on the sleeve cuts, but it's ok, you're going to serge those anyway.
Step 3. - Head to the serger ! Run a rolled hem all around the neck line you just cut and around each sleeve. I was lazy this morning and so this isn't a rolled hem on mine...but that's ok, I kinda like the look of a serged edge anyway...just be sure to use coordinating thread :) I like the black thread with the purple of the shirt !
After you've serged the neck and sleeves this is what you should have....
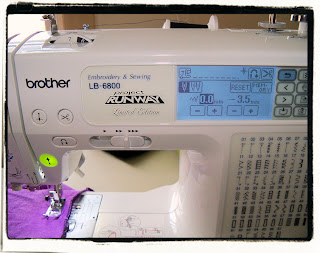
Step 4. - Head to the sewing machine. We're going to shirr around the neckline and the sleeves now. For my machine I have to machine wind the elastic thread on the bobbin, set my top thread tension to about 7, and my stitch length to 3.5 to 4
Place your shirt on the sewing machine and shirr your first row about 3/4" to an inch away from the serged edge. Start slow and make sure you backstitch a couple times over the beginning stitches so the elastic thread doesn't pull out. You also need to make sure you have your shirt on the machine with right side facing up..you want to see the right side of your fabric when you're shirring.
I make about 3 rows of shirring on the neckline and then 2 on each sleeve - I use my presser foot to measure and align the rows. When I start a new row of shirring I just put the right edge of the presser foot next to the last row of shirring, it makes a nice distance between rows.
Once you have the shirring done...you're finished !! You should have something that looks like this....
A cute little peasant top in the white one above I even added some embroidered embellishment to the lower corner of it to give it a little something extra :) These are so comfy and much cuter than just a big, oversized Tee !
Good luck and I hope you let me know if you try this out yourself :)
Monday, March 28, 2011
Subscribe to:
Post Comments (Atom)


0 comments:
Post a Comment